My Four Points Dress
Last year there was some activity online around a pattern from Vogue (1312) which featured prominent angular structures in the skirt. Several bloggers offered up their own versions of this construction which came to be known as the tablecloth skirt or 'garment formerly known as tablecloth' although it really doesn't have much to do with tablecloths at all. At the time I thought it looked fun so I bookmarked it for later.
Now it's later, and with the teasing glimpse of warmer weather over the Easter weekend, I thought I'd see about making something like this myself. I thought I'd go for a dress with a fitted bodice, short sleeves and pockets. I had 3 metres of inky blue (photos are lightened for detail) light-weight linen that I'd bought on sale which would be perfect for this project, which I call the Four Points Dress.
Note: no tablecloths were harmed in the making of this dress!
Having recently finished drafting a well fitting sleeveless top pattern, I figured it would not be much work to draft a sleeved version. I knew I needed to lower the armholes slightly, and I thought I'd have to draft the sleeve. There are any number of tutorials on how to draft a sleeve and I read several because drafting a sleeve is not really a simple thing. It requires a shape something like a segment of a sine wave, with a convex curve at the cap transitioning into concave curves towards the underarm seam.
If you've ever seen the pattern piece for a sleeve, it is hard to image that this shape will actually fit together with the oval arm opening, but it does. To add to the complexity, the curves for the front and back of the sleeve are slightly different (the front is a bit deeper to accommodate the way our shoulders and arms move). These curves are based on a series of body and pattern measurements.
Just as I was about to tackle this arcane bit of drafting, I thought to check if any of the commercial patterns in my stash had a sleeve that would work with the top. And wonder of wonders I found one that only took a few minutes to refine to a clean fit. I know, I know, it would have been a good thing for me to learn to do. But I was impatient to get going.
Thus the bodice went together very well. (I love sewing with linen. It just does what you want it to do.) I had made it just short of waist length and it looked good! The self bias binding around the neck was smooth and invisible. The top stitching was even and straight. The sleeves were set in cleanly. Nice work.
Then it was on to tackle the skirt. This is a very simple thing - and in a minute you'll see why it has been called the table cloth skirt. Essentially it is a square of fabric with 4 panels attached to the sides and then to each other, plus a hole cut in the middle for the waist. It's a bit nuts to think about cutting a hole smack in the middle of this construction, but that's what you do.
Here's the basic tablecloth skirt pattern:
 The size of the square and the side panels defines the length and the volume of the skirt. The distance from the edge of the hole to the bottom of the side panel approximately equals the length of the skirt. And if the side panel that is much wider than it is deep you'll get a more irregular hem line. This is an important characteristic that I didn't realize until after I'd finished the dress. I decided on a 34" square with 22" x 34" side panels, plus a hem allowance which put the points at about knee length and made the tea length hem more or less even.
The sewing went very easily - thanks to a tip I picked up to leave the last 1/2" of each seam open to make it easier to bring the 3 points together at each intersection. I sewed by machine first and then serged the seams to finish them.
The next step was to cut the hole for the waist. I measured the bottom edge of the bodice to get the circumference for the hole, and then got all lazy and used an online circle calculator to work out the radius seeing as my geometry education is long behind me. This made it easy to make a little paper pattern, fold the skirt in quarters and cut the right sized hole. Easy, but still a bit scary.
I ran a line of stitching around the hole, with a long stitch length, in case I needed to do any easing. This was a good idea in the long run, although I didn't need it - initially.
The skirt and the bodice went together like a dream, although it was beginning to be a lot of fabric to manage by the sewing machine. This should have been a sign of trouble to come - like going to the mall on a miserable rainy or snowy day and getting a really good parking space. You just know this means that you'll not find a thing that you are a looking for.
I tried the dress on. The shoulders and bust fit perfectly, but where the skirt joined the party the dress was huge! I mean big enough for me and a small friend to wear at the same time. Ack.
Here's where I'd made my error: I used the tank top pattern to make the bodice, but I didn't think about the width difference between a hip length tank and a midriff length top. For a long top, the width has to taper out from the underarms towards the hem to accommodate your hips. But when the top stops above the waist, it can be much more fitted. In my case I realized I needed to take out inches of width - a big handful of the dress. O. M. G.
I can just hear you thinking "It's no big deal Gil. Stop being so dramatic and just take in the side seams of the bodice!" Hah. Not so fast. Sure it would be easy to make the bodice smaller, but I had this big hole in the middle of my skirt, and you just can't cut a hole smaller.
So, I unpicked the skirt - which would become a recurring theme of the day - and put two big darts in the back of the bodice to make it fit a bit closer the body. Nice. Then I used the line of stitching I'd put around the circle at the start to gather the skirt and sewed it back onto the bodice.
And tried it on again. This time it fit much better, but the skirt, due to the rather extreme amount of gathering stood out around me like a tutu. As in too too much volume.
So I unpicked the skirt. Again. I really needed the hole in the skirt to be smaller so I took out all the gathers, pressed everything smooth again and then laid the circle back in the hole and zig zagged the edges together. And after a little return visit to the circle calculator, cut the new, smaller hole out of the skirt. This worked, but it was not pretty. Not pretty at all. I'd have to find a way to cover the patched area, but due to my rather rectangular figure, a wide belt or sash was not going to be possible.
And this is where chance stepped in and helped me. In my frustration, I returned to the gallery page of people's skirts - and wasn't there a nice example of a similar dress there now. On this dress the sewist had raised the waist to empire length and put the skirt under a deep pleat at the bottom of the bodice. This would solve my problem very well. Thank you rivergum!
So I unpicked the skirt for a third time. Then re-measured the length of the bodice and turned under a deep hem - about 2" - and top stitched the very bottom edge. I then stitched the skirt to bodice at the top edge of the band.
Of course, it wasn't quite that straight forward. In the process of all the stitching and unpicking the skirt hole had stretched a bit and so I had to do some gathering. Not much, but more than I would have really liked. In the end you wouldn't know that I'd had some issues with the skirt - unless you were to peek under the pleat. (Don't.)
Phew. That was a lot more work that I had really planned, but I was pretty pleased with the dress. Moving the waist up meant that the points also moved up, so they went from being just at the knee to mid thigh which did change the where the visual weight of the dress is. Thus, it is a bit more voluminous than I had envisioned, but it moves so nicely and pops on over my head in way that you just know will be very appealing on a hot day.
With the bottom hemmed (by machine as it is almost 4 yards!) and everything ironed I headed downstairs to show Mark what I had made. I was hoping for a compliment but I would have been satisfied with a distracted "very nice" if I had interrupted a fishing show, or even an astute observation that I had not yet added the pockets. But I was not prepared for laughter. Yes, he laughed. After all I'd been through.
I angrily retreated to the girl cave and left the offending garment to hang in disgrace for a couple of days. Then I tried it on again. And you know what? I still like it! Sure it's a bit costume-y and a bit of a radical silhouette. But after a winter of black jeans and turtlenecks, it is a breath of fresh air. I think it looks good and it feels great, so I'll be wearing it come summer.
In public even.
Ha ha ha.


 |
| 3 of the 4 points showing here |
Note: no tablecloths were harmed in the making of this dress!
Having recently finished drafting a well fitting sleeveless top pattern, I figured it would not be much work to draft a sleeved version. I knew I needed to lower the armholes slightly, and I thought I'd have to draft the sleeve. There are any number of tutorials on how to draft a sleeve and I read several because drafting a sleeve is not really a simple thing. It requires a shape something like a segment of a sine wave, with a convex curve at the cap transitioning into concave curves towards the underarm seam.
If you've ever seen the pattern piece for a sleeve, it is hard to image that this shape will actually fit together with the oval arm opening, but it does. To add to the complexity, the curves for the front and back of the sleeve are slightly different (the front is a bit deeper to accommodate the way our shoulders and arms move). These curves are based on a series of body and pattern measurements.
Just as I was about to tackle this arcane bit of drafting, I thought to check if any of the commercial patterns in my stash had a sleeve that would work with the top. And wonder of wonders I found one that only took a few minutes to refine to a clean fit. I know, I know, it would have been a good thing for me to learn to do. But I was impatient to get going.
Thus the bodice went together very well. (I love sewing with linen. It just does what you want it to do.) I had made it just short of waist length and it looked good! The self bias binding around the neck was smooth and invisible. The top stitching was even and straight. The sleeves were set in cleanly. Nice work.
Then it was on to tackle the skirt. This is a very simple thing - and in a minute you'll see why it has been called the table cloth skirt. Essentially it is a square of fabric with 4 panels attached to the sides and then to each other, plus a hole cut in the middle for the waist. It's a bit nuts to think about cutting a hole smack in the middle of this construction, but that's what you do.
Here's the basic tablecloth skirt pattern:

The sewing went very easily - thanks to a tip I picked up to leave the last 1/2" of each seam open to make it easier to bring the 3 points together at each intersection. I sewed by machine first and then serged the seams to finish them.
The next step was to cut the hole for the waist. I measured the bottom edge of the bodice to get the circumference for the hole, and then got all lazy and used an online circle calculator to work out the radius seeing as my geometry education is long behind me. This made it easy to make a little paper pattern, fold the skirt in quarters and cut the right sized hole. Easy, but still a bit scary.
I ran a line of stitching around the hole, with a long stitch length, in case I needed to do any easing. This was a good idea in the long run, although I didn't need it - initially.
The skirt and the bodice went together like a dream, although it was beginning to be a lot of fabric to manage by the sewing machine. This should have been a sign of trouble to come - like going to the mall on a miserable rainy or snowy day and getting a really good parking space. You just know this means that you'll not find a thing that you are a looking for.
I tried the dress on. The shoulders and bust fit perfectly, but where the skirt joined the party the dress was huge! I mean big enough for me and a small friend to wear at the same time. Ack.
Here's where I'd made my error: I used the tank top pattern to make the bodice, but I didn't think about the width difference between a hip length tank and a midriff length top. For a long top, the width has to taper out from the underarms towards the hem to accommodate your hips. But when the top stops above the waist, it can be much more fitted. In my case I realized I needed to take out inches of width - a big handful of the dress. O. M. G.
I can just hear you thinking "It's no big deal Gil. Stop being so dramatic and just take in the side seams of the bodice!" Hah. Not so fast. Sure it would be easy to make the bodice smaller, but I had this big hole in the middle of my skirt, and you just can't cut a hole smaller.
 |
| Back dart and pleat details |
And tried it on again. This time it fit much better, but the skirt, due to the rather extreme amount of gathering stood out around me like a tutu. As in too too much volume.
And this is where chance stepped in and helped me. In my frustration, I returned to the gallery page of people's skirts - and wasn't there a nice example of a similar dress there now. On this dress the sewist had raised the waist to empire length and put the skirt under a deep pleat at the bottom of the bodice. This would solve my problem very well. Thank you rivergum!
 |
| A peek under the pleat - yikes! |
Of course, it wasn't quite that straight forward. In the process of all the stitching and unpicking the skirt hole had stretched a bit and so I had to do some gathering. Not much, but more than I would have really liked. In the end you wouldn't know that I'd had some issues with the skirt - unless you were to peek under the pleat. (Don't.)
Phew. That was a lot more work that I had really planned, but I was pretty pleased with the dress. Moving the waist up meant that the points also moved up, so they went from being just at the knee to mid thigh which did change the where the visual weight of the dress is. Thus, it is a bit more voluminous than I had envisioned, but it moves so nicely and pops on over my head in way that you just know will be very appealing on a hot day.
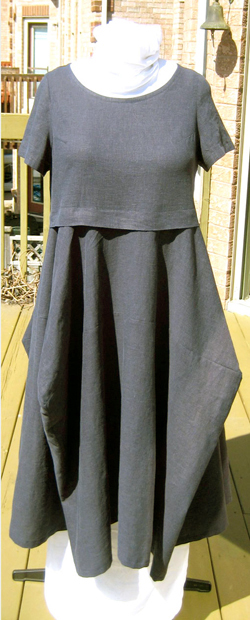
 |
| Imagine this is a hot breezy day in July, not the actual cold blustery day in April! |
I angrily retreated to the girl cave and left the offending garment to hang in disgrace for a couple of days. Then I tried it on again. And you know what? I still like it! Sure it's a bit costume-y and a bit of a radical silhouette. But after a winter of black jeans and turtlenecks, it is a breath of fresh air. I think it looks good and it feels great, so I'll be wearing it come summer.
In public even.
Ha ha ha.


Comments
Post a Comment