Posts

Showing posts from 2012

Tiny Birds

Image
Here's the thing about being on sabbatical. Sometimes you can just say yes to a slightly ridiculous notion and run with it. I woke up one morning in December with the idea of making some little felt birds. 3D, fully hand sewn tiny birds.  I've no idea where the notion really came from, but the form of them was pretty clearly worked out in my mind before I even got out of bed. The first one I made was roughly the right shape but way too big. Which is a strange thing to say when you consider that I had no idea what I was making the bird for in the first place. The second one was much (much!) smaller, but too fat and a bit lumpy. The third one, like porridge for bears, was just about right. Patten refined and with tail options,  and with the correct stuffing medium in hand, I started sewing little birds. And sewed, and sewed, and sewed. About  a dozen birds later I had a nice little flock rolling around on the kitchen table. They were colourful. They were funny. ...
Alabama me - part 2

Image
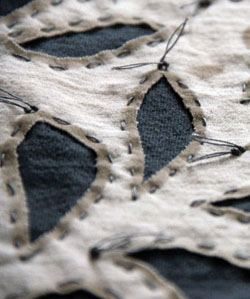
Following on from my previous post, I have also been working on some samples of the appliqué methods shown in the lovely book Alabama Studio Sewing + Design: A Guide to Hand-Sewing an Alabama Chanin Wardrobe by Natalie Chanin. Reverse Appliqué I have a little experience with reverse appliqué - which is when you have two layers of fabric, a stitched pattern and then cut away some of the top layer to reveal the bottom layer. I remember doing some sweatshirts with this, way back in the 80's. Yes, that was in the previous century. So for that reason I didn't do an Alabama Studio style sample of this technique. At right is an example from the Alabama Chanin web site which shows it very well. Essentially, the process is the same as I was discussing earlier, but in this case you cut out some of the stencilled design. Changing how much you remove, how you have done the outline stitching and the colour of the two layers creates many variations that make the pattern be sub...

Alabama me, part 1

Image
This past week I've been quite absorbed by a new book - Alabama Studio Sewing + Design: A Guide to Hand-Sewing an Alabama Chanin Wardrobe by Natalie Chanin. Maybe absorbed isn't quite the right word. Possibly obsessed. Natalie is the founder of the clothing line Alabama Chanin. You can check out the company site here , but you'll actually see a lot more images if you just use Google Images. The clothing is quite remarkable. Although the actual garment designs are relatively simple, they are all completely hand sewn by women in Alabama, made from organic locally grown cotton, and feature a range of embellishments that are stunningly labour intensive. Here's a montage to give you an idea of what the surfaces look like. And these lovely things are every bit as expensive as you would imagine. But in an interesting turn, Chanin has made the clothing potentially available to a wider market by not only selling completely customizable sew-it-yourself kits and supplie...

Inbetween the dots there were rectangles.

Image
I actually didn't plan to blog about this, but the technique was so effective, I thought I'd share it after all... While working on the red jacket (previous post) I had several side projects going on - something to do when I got tired of sewing all those dots. One of these was working out a way to brighten up the backsplash in the kitchen. Mark and I had the kitchen redone last year. I love the counter-top stone we chose, which went so well with the existing cabinet. But I never loved the backsplash tile. It looked very good, completely appropriate, and it was the best choice available. It has an interesting detail band with stone and glass mosaics,  but it just isn't me. I wanted bright colours, but apparently that just wasn't in style (last year). Here's what it looked like. But then I was in Rona or Lowes or something the other day and what are they showing in the tile department? Colour. Lots of it. Which just made me go home and look at the backspla...

Time Flies and A Great Red Jacket

Image
Wow, it's been a couple weeks since I last posted. It's been a busy time! I've been out and about a lot - seeing the World Of Threads Festival shows in Oakville and Toronto, going to the ROM to see the new textile show "Big" and enjoying some (finally) nice autumn weather. But in-between the outings I have been working hard at the sewing machine. So here it is (drum roll) - my first garment of the sabbatical. I'm very pleased with how this jacket turned out! It took a rather long time to make but the process has been totally worth it. Inspiration I've always been attracted to the modular design patterns by Kayla Kennington . And always quite intimidated too! Kayla's patterns are all built of simple geometric shapes which makes them easy, but they are not sewn with traditional seams. Instead the pattern pieces are all finished with rolled hems, finely served edges or lined and turned. And then the pieces are connected by decorative stitchin...

The Cursed Shabby Chic Scarf, or How White Lace Made My Skills Look Shabby

Image
Have you ever had a piece of clothing that seemed to be cursed? I once had a white cotton tuxedo style shirt - all small tucks down the front - that was truly cursed. Every time I wore it I got something on it. Pasta sauce. Chocolate. Gravy. Ink. The mystery stain. You know. I think I have another cursed clothing item now… I had a remnant of white stretch lace that I bought thinking it would make a frothy shabby chic scarf. The fabric was so lovely that it sort of intimidated me. I've had it hanging up in my sewing room for ages. Every time I walked by it I'd eye it and think "this week". That went on for about a year. Finally this week  arrived. Mostly due to the fact that I was avoiding starting my next sewing project. But I digress. I cut a 10 inch wide strip of the fabric - as long as the remnant would allow. I knew I'd need to pieced for the length I wanted, but first I needed to finish the long sides. And this is where the curse first showed itsel...

The Last T Shirt Scarves...For Now

Image
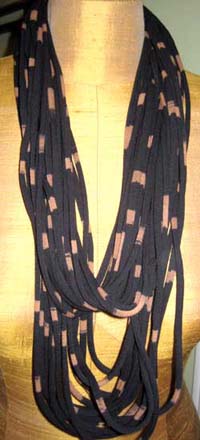
I'd like to say that I've been busy with making lots of new things for the past week or so, but it wouldn't be completely true. I've been playing hooky a bit, taking advantage of  any sunny autumn day that comes my way. It really is my favorite season, and I'm enjoying being able to be out in it this year. Part of what I love abut the fall is tossing on a great scarf with jeans and a sweater. And this last round of T Shirt scarves falls into that category. Having used the t Shirts as-is, dyeing and tie dyeing them, my last version has involved discharge dyeing - that is removing colour from the fabric via various methods. The simplest way to do this is with good old bleach. I'm fond of using straight bleach, especially on sturdy fabric like a quality T shirt or denim. If the fabric is more delicate, the bleach can be diluted with water. I like to paint it on with a brush. For small details I fill up a water pen with bleach. I've read of people using a...