Alabama me - part 2
I have a little experience with reverse appliqué - which is when you have two layers of fabric, a stitched pattern and then cut away some of the top layer to reveal the bottom layer. I remember doing some sweatshirts with this, way back in the 80's. Yes, that was in the previous century.
So for that reason I didn't do an Alabama Studio style sample of this technique. At right is an example from the Alabama Chanin web site
which shows it very well.
Essentially, the process is the same as I was discussing earlier, but in this case you cut out some of the stencilled design. Changing how much you remove, how you have done the outline stitching and the colour of the two layers creates many variations that make the pattern be subtle or very obvious. Personally I prefer the look achieved when there is less contrast between the two fabric colours.
Negative Reverse Appliqué
Sounds a bit odd, right? But this is actually the opposite process from regular reverse appliqué. Instead of cutting away the stencilled design, in this case you cut away the background fabric from the top layer. I found this to be a really fascinating design approach - and so gloriously destructive, as you'll see a bit further down this page.
For these samples I really needed the proper fabric and I managed to find one bolt of 100% cotton jersey on a clearance table at Fabric Land. It's a slightly slubby knit, so the stencilling is not quite as smooth as it would be on a flat knit, but overall it does the job just fine. But it's a lot of red... I could have used a change of colour!
Once again, I did a number of variations of the technique all on one sample. In this case I used a quickly hand drawn stencil that I cut out of some contact paper (what we used to call MacTac - it was made in Brampton back in the day!).

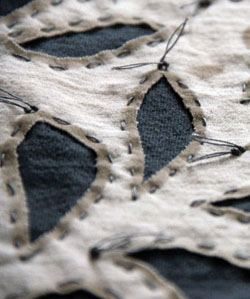
The real beauty of this technique is more obvious when the fabric has been worn a bit, or washed, allowing the cut edges to soften and roll. The more fabric you leave around the pattern, or the further you stitch inside the stencilled areas, the more of this rolling will occur. You can see the effect in this close up.
I can see me using this negative reverse appliqué technique in near future. Again, to my design sensibilities, if the colours of the fabric and stencilling are more similar (simply variations in tone) then the overall look will be richer. Sort of like rough brocade.

Now that I have the basic techniques under my belt, I have been playing around with using them in some rather different ways, without going the stencilled pattern route. I've used a contrasting thread in each of the following samples so that the structure shows well in photos. Just wish I'd thought to take before and after pictures!
First off, I did some straight stitching in slightly irregular lines on two layers of the red jersey fabric. Then I cut between the lines. This is essentially reverse appliqué without actually removing any of the top fabric. Really it is a basic chenille technique that is usually done with many layers of fabric. This works very well with the jersey - and I can see it getting a great 'patina' from wear. I imagine this as a border on the lower edge of a jacket or a vertical insert in a t shirt or top.


Next thing to try was using some free motion stitching with negative reverse appliqué. This could be a tightly packed or loose open pattern, simply based on the stitching. This one took a while to cut out!
I can see this being a very effective overall technique for yardage, a border or feature panel. Patience would be required. Plus a good vacuum cleaner. Cutting this stuff up made a big mess. There are still tiny bits of red turning up in odd places around the house.
This is approximately actual size. By the way, you need small, sharp, pointed embroidery scissors for all this kind of work.


Finally, I worked a sample of reverse appliqué using a more geometric pattern. I combined this with reverse negative work on the edge, which is visible on the larger image below. I think that this is a pretty cool effect to use as a transition. I can imagine the transition occurring near the hem of a sleeve, skirt or the bottom of a jacket, especially if the two layers were different colours.

All in all, I can say I've learned a lot from the Alabama Chanin book. I'm ready to sew a garment with some of these embellishment techniques now. However I will not be hand sewing all the seams! A charming concept but I like the strength and smoothness of a machine sewn seam - not to mention the speed. Sort of like choosing to drive a manual transmission car when a perfectly good automatic is also available. Oh, I know I'm going to get email about that!


Comments
Post a Comment